Table of Contents
Workflows
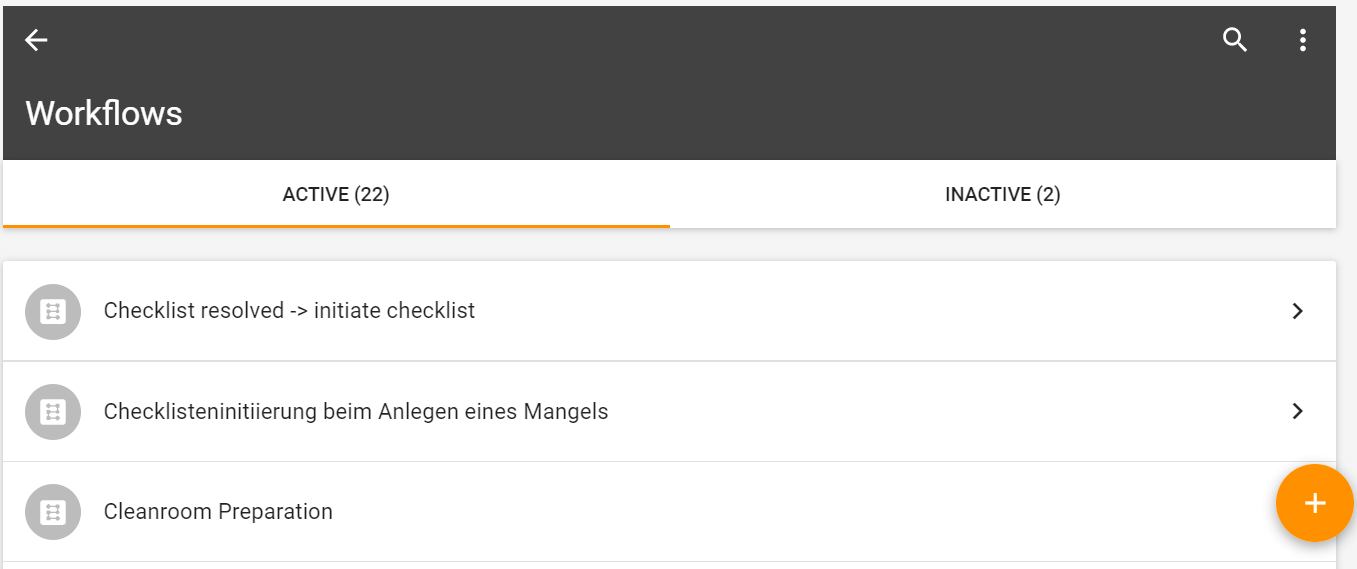
Under "Administration" in the workflow section the user can automate his Testify environment. Specific events can be defined that trigger actions. Workflows can be activated, deactivated, overwritten, but not deleted.
Add a new Workflow
When adding a new workflow, the user must define a title. The title should be meaningful, so that one can already recognize in the menu, which task the workflow fulfills. A description can be added optionally.
Then the triggering event and subsequent action must be defined. If necessary, multiple triggering events and actions can be added.
Each event, each action and the entire workflow must be saved separately.
Examples/Use Cases under Workflow Examples
Events
In the “Events” section steps must be defined that must be fulfilled in order to trigger the action. When creating events the following informations have to be specified:
Scope: The scope defines the entity where the event takes place
Type: The type defines the change of the entity. (created / updated)
Filters/Trigger: Filters can be applied to specify the required conditions. Here can be defined that the event is only valid for certain test objects, checklist templates, etc.
Filter: Filters for attributes of the object
Triggers: Defines the field, which has to be changed to a certain value, to trigger the workflow. This condition must be met for the workflow to be triggered.
Filter before change: Filters for attributes of the object before the update (If a property of the affected object has changed, you can filter on the value before the change, i.e. before the event was triggered).
Filter after change: Filters for attributes of the object after the update (This condition must apply at the time of workflow execution).
→ Difference between trigger and filter before/after change.
Example: State Verified → The event is triggered when the checklist State changes to verified. A filter before change can be defined, but does not have to be (e.g. State Completed).
The filter before change is only applied if the property has actually changed. If the property is the same or incorrect before and after the event, the workflow is not executed because the filter does not apply.
Scope: Checklist
Type: created
Possible filters: Test object (types), State, Assigned to, Created by, Modified by, Checklist templates
Type: changed
Possible triggers: State, Assigned to, Modified by
Possible filter before change: Test object (types), State, Assigned to, Modified by, Checklist templates
Possible filter after change: Test object (types), State, Assigned to, Created by, Modified by, Checklist templates, Scoring
Scope: Issue
Type: created
Possible filters: Test object (types), State, Assigned to, Created by, Modified by, Category, Severity
Type: changed
Possible triggers: Test object, State, Assigned to, Changed by, Category, Severity
Possible filters before change: Test object (types), State, Assigned to, Modified by, Category, Severity
Possible filters after change: Test object (types), State, Assigned to, Created by, Modified by, Category, Severity
Scope: Test object
Type: created
Possible filters: Test object types, Created by
Scope: PDF
Type: Issue PDF generated
Possible filters: Test object (types), State, Assigned to, Created by, Modified by, Category, Severity, PDF protocol profiles
Type: Checklists PDF generated
Possible filters: Test object(s), State, Assigned to, Created by, Modified by, Category, Checklist templates, PDF Protocol Profiles
Scope: User
Type: created
Possible filters: Roles, Groups
Scope: Timer
Type: trigger
Parameters: Cron timer
The timer feature allows tasks to be scheduled periodically. This is possible via a cron timer. The timer feature can be set based on minutes, hours, days, weeks or months. The cron trigger always refers to the UTC time zone, times must therefore be converted if necessary (e.g. 12:00 UTC is 14:00 CEST in Austria).
The desired repetition can either be specified directly in the cron format or selected and converted manually in advance. There are two possibilities when converting the desired repetition:
External converter: select desired repetition online and convert it
Selection of the desired repetition including automatic conversion directly in Testify:
Minutes
e.g. every 30 minutes
Hours
e.g. every 2 hours or always at 10:00 AM UTC
Daily
e.g. every 2 days or weekdays incl. desired time (e.g. 10:00 AM UTC)
Weekly
Specification of the desired weekdays e.g. only Mondays, Monday & Friday or Monday-Saturday incl. desired time (e.g. 10:00 AM UTC)
Monthly
Specification of the exact day (e.g. 4th day per month) or
Last day of the month or
Last weekday of every month or
Indication of days before the end of the month (e.g. 2 days before end of month)
incl. desired time (e.g. 10:00 AM UTC)
Example:
Actions
When creating actions, the following information must be specified:
Scope: The scope defines which action should be triggered
Type: The type defines the change of the entity.
Parameters: Parameters for the triggered action must be defined here (such as test objects, checklist templates, etc.). In this section, the values already defined in "Filter" above can be easily reused by selecting the "Reuse field value if available from event" button.
Defining all parameters is mandatory in this section.
Scope: Checklist
Type: create
Parameters: Test object, Assigned to, Created by, Checklist templates, Due date
Scope: Issue
Type: create
Parameters: Assigned To, Created By, Category, Severity, Due Date
Optional Parameters: Test object, title, description
Scope: Webhook
Type: trigger
Parameters: URL
Optional Parameters: Identifier, HTTP request timeout in seconds (default is 20), HTTP status codes that indicate success. Other codes will lead to several retries before failing.
Scope: PDF
Only possible for events with area checklist or issue
Type: send
Parameters: PDF protocol profile, Language
Scope: Notification
Type: send
Parameters:
Default language and input field for the custom message.
After that, the language can be changed and a custom message can also be translated
Send to: Who will receive the notification (people or groups)
Notification type (mail or in-app)
Example:
Delay
Delays can be added in order to execute actions only at a later time.
Delay calculated from
+/-days
+/- hours
Filter event after delay
Example
Connected workflows
Workflows can also trigger a sequence of other workflows. This allows processes to be mapped and automated even further. The feasibility of the workflow sequence must be taken into account. Workflows can only trigger further workflows if these are also meaningful and no loop is created as a result. For this reason, manual intervention may be required between two workflows so that the further workflows are pushed through, otherwise the sequence is not possible.
Possible connected workflows
Checklist or issue
Workflow 1
Action: Checklist or issue created or updated
Workflow 2
Event: Checklist or issue
Valid Actions: PDF, notification, webhook
Invalid Actions: Checklists, Issues
Test object
Workflow 1
Action: Test object created or updated
Workflow 2
Event: Test object
Valid actions: Notification, Webhook
Invalid actions: Checklists, Issues
Examples
Edit / disable workflows
After creation of the workflow it can be edited or disabled/enabled by clicking on the context menu (the three dots) in the upper right corner of the Workflow.
Workflow-History
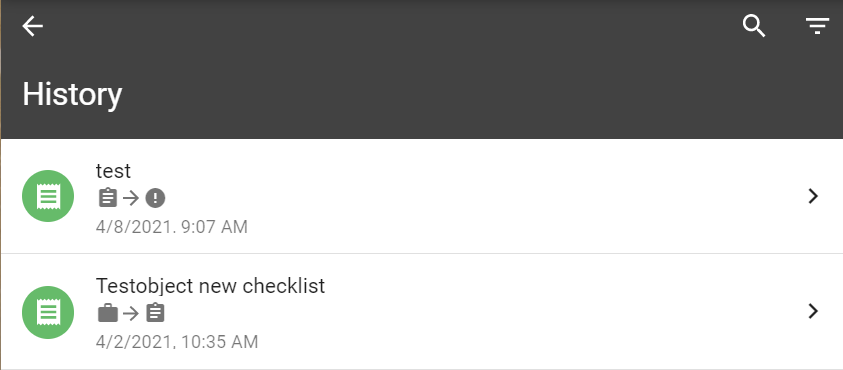
Workflows have a history where all previous steps are displayed. This feature allows to check the successful and failed executions of all workflows. For each execution attempt, a separate entry is created with all relevant information. Filters can be set to ensure transparent troubleshooting.
It also shows when a workflow was activated/deactivated and whether this was done automatically or manually by a person.
The workflow history can be viewed by clicking on the context menu (the three dots in the right corner).
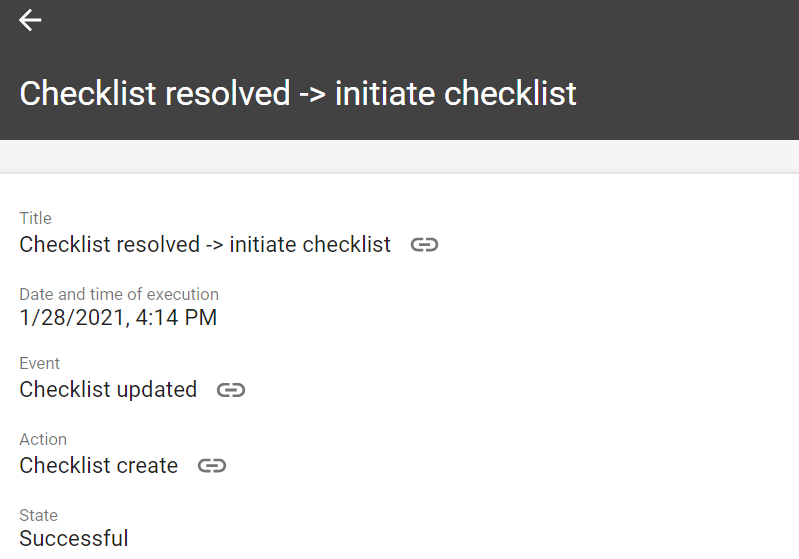
By selecting the desired entry, the history is displayed:
All important information can be seen at a glance. Through the link icon on the right side, the individual points can be expanded and further details can be displayed.
When using delays, there are the following options that are displayed depending on the status:
Open/Planned Actions: Date and time of the trigger" and "Date and time of planned execution".
Successful and failed actions: "Date and time of execution".
Disabled workflow ""The workflow got disabled during the delay".
Workflow does not match the event: "The filter after the delay did not match the requirements".


