The administration section Table of contents
| Table of Contents |
|---|
The Administration is the last tab on the left side of the application. In this section the user area, users with appropriate permissions can manage the settings of the whole entire environment. Depending on the permissions, the administration can contain up to 9 items and The administration is used to define the environment and the settings for the intern internal processes and use cases. Every setting concerning All settings related to the management of issues/checklists and the organization can be found in this sectionarea.
| Child pages (Children Display) | ||
|---|---|---|
|
Export and import of data in Testify
Content creation Creation of entities is possible either directly in Testify by manual creation or by export/import. Using the context menu (the three dots) on the top right of the respective entity in the administration area, an Excel list can be generated exported or uploaded imported for download.
This function is currently available for the following entities:
Test object types and test objects
Equipment types and Equipment
Issue categories
Users
Groups
An empty (or pre-filled) exported Excel list can be manually filled with the desired content and then imported again, so that Testify is supplemented with this data. This is especially convenient and efficient when multiple contents are to be imported at once.
To ensure that only those cells are updated for which there is new data, the following rule exists:
Cell has a value: new value is saved
Cell has no value: old value of the cell is kept
Cell has value {clear}: old cell value is deleted
Optional columns: If an entire column is not to be changed, the column can be deleted in the Excel file and all entries remain unchanged.
General information about creating new entities via Excel import.
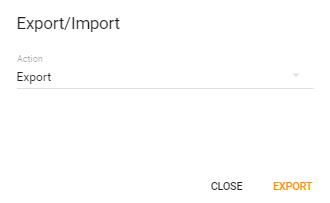
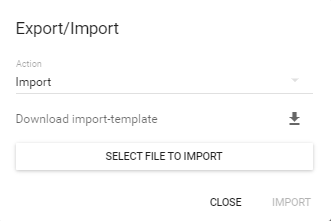
By selecting "Export" the existing entities (if any) will be downloaded. This Excel file can also be used as a template for another import. By selecting "Import" an empty import template can be downloaded.
The ID of the respective entity is unique and is automatically generated by the system during import. By exporting again, the ID is displayed.
Partially it can be deposited whether these are active or inactive, whereby active stands for 1 and inactive for 0.
The new entity must be titled and described at least in the stored client language. Additional languages are possible. To add additional translations, a column with the desired language can be added. The locale codes are as follows:
Bosanski = bs
Deutsch = de-AT
English (UK) = en-GB
English (India)= en-IN
English (US) = en-US
Español = es-MX
Français = fr
Nederlands = nl
Português = pt-BR
Русский = ru
中文(中国) = zh-CN
中文(台灣) = zh-TW
If the import is successful, a green success message is displayed. If it fails, an error message appears.
This feature is currently available for the following entities:
Test object types and test objects
When creating test object types, a title as well as a description must be specified. Avatar indicates the icon that can be added. By default, the suitcase icon is stored here with the designation "work".
When creating test objects, a title and a description must be entered. The ID of the test object type must also be entered under "ParentId". If custom fields are available, they can be filled in here.
When creating equipment types, a title as well as a description must be specified.
When creating equipment , a title and a description must be entered. The ID of the equipment type must also be entered under "TestEquipmentTypeId". The vendor can also be specified under "Vendor" and the validity date under "ValidUntl (UTC)".
Multilingualism
This functionWhen creating custom fields, a title and a description must be entered. The data type must also be specified under "DataType". The data field is to be (de)activated with 1 and 0 under "Datafield".
By means of custom fields assignment, custom fields can be added to measuring device types.
When creating defect categories, a title must be specified. By means of "ParentId" a superior defect category can be defined.
Import: Update and add groups possible. When creating groups, a title as well as a description must be specified.
Import: Update and add users possible. Roles that do not comply with the standard have their own identifiers.
Avatar
 | ||||||
mood | public | school | business_center | tram | train | place |
 | ||||||
local_shipping | flight | directions_bike | directions_bus | directions_car | cloud | palette |
 | ||||||
brush | devices | battery_charging_full | weekend | business | call | work |
 | ||||||
shopping_cart | store | favorite | pets | motorcycle | face | account_balance |
 | ||||||
event | schedule | |||||
ID
The ID of the respective entities (for example, test object type ID) is displayed after the export or queued in the respective URL. Example:

Multilingualism
This feature makes it possible to translate the desired content before importing it. For this, columns can be inserted in the Excel list in the desired language. Example:
Title_en-US
Description_en-US
Title_de-AT
Description_de-AT
Title_nl
Description_nl
Example "Test object
types and test objectstypes”
Administration tab - Select test object types - Click on the context menu in the upper right corner:

Select whether test object types or test objects should be exported/imported


Selection "Export/Import: Test object types"

Select action (export or import)

Open the Excel list: View of the existing data. For a data import, the tabs can be filled with the necessary content:

The ID is an internal field which is not visible in the system. The ID must be unique and can be entered manually. If this field remains empty, it will be generated automatically by Testify in the background.
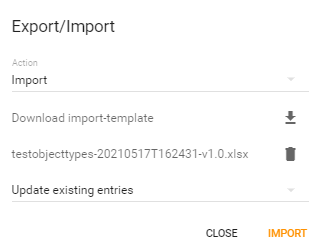
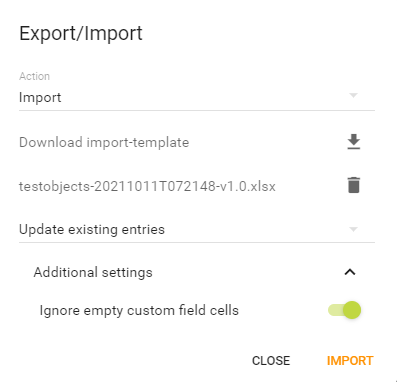
If the list is filled, it can be imported:
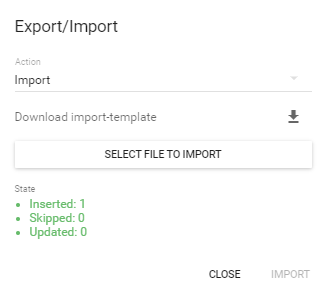
Selection whether existing entries should be updated or skipped:

View after successful data import:

Example "Test objects”
Administration tab - Select test object types - Click on the context menu in the upper right corner:
Selection "Export/Import: Test objects"
Select action (export or import)

Open the Excel list: View of the existing data. For a data import, the tabs can be filled with the necessary contents:
content
The following information is stored: Id, TestObjectTypeId, Title, Identifier, Description, ParentId, IsActive. In addition, there is one column per custom field.

The ID is an internal field which is not visible in the system. The ID must be unique and can be entered manually. If this field remains empty, it will be generated automatically by Testify in the background.
If the list is filled, it can be imported:
Selection whether existing entries should be updated or skipped:
View after successful data import: